‘DIY’ Category

  1. Gatsby Glamour- DIY Turban

    May 13, 2013 by Emma

    Gatsby Glamour - DIY 1920s Velvet Turban

    I went to see the new Great Gatsby movie on Friday and absolutely loved it. And because I never miss the opportunity to dress up, I had to wear this 1920s inspired velvet turban that I made earlier this year. I love how it adds a bit of 1920s glamour to a simple all black outfit. Now I can’t compare with Carey Mulligan’s costumes –or her jewels for that matter– but this headband made me feel quite posh while sitting in the theater. It’s really quite easy to make, too!

    DIYTurban-Steps1to4

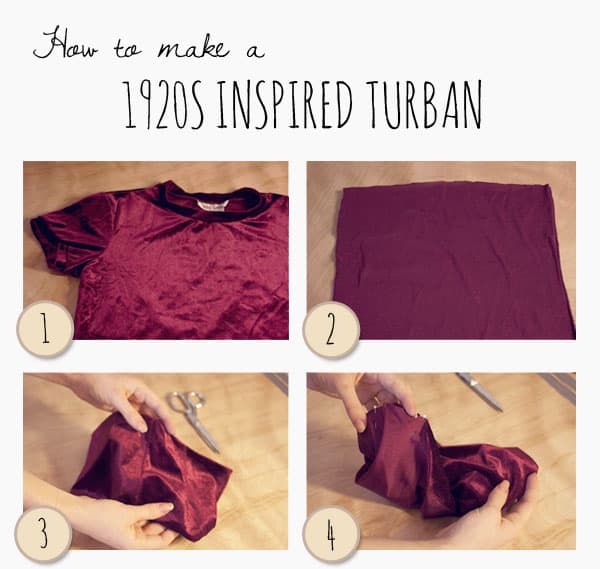
    1. Gather your fabric– I used this velvet children’s shirt that I thrifted. Make sure that whatever you find is stretchy!
    2. Next you need to figure out the dimensions of the rectangle you need to cut. Measure the circumference of your head loosely and add 1 1/2 inches to get the long side of your rectangle. Mine was 25″. The short side of the rectangle is 12″. You can make this longer if you want a more gathered look to your turban.
    3. Sew the short ends of rectangle together to create a tube.
    4. This is when it’s easy to get messed up, so pay attention to this step! The first time I did it, I managed to sew my turban shut. So, turn the sides of the turban together so that the velvet side is out. Then tuck the raw edges in like how it will be when it is finished. The reason you’re pinning this together is to make sure that you sew the correct sides together! Reach into the turban and begin to turn it inside out, pinning the edges together as you go. You can’t turn it completely inside out because of the nature of the tube. It’s going to look like a bunched up piece of fabric, but this is correct so don’t worry about it! Sew these pinned edges together, leaving a hole of about 2″ so that you can turn it right side out again.
    5. DIYTurban-Steps5to8
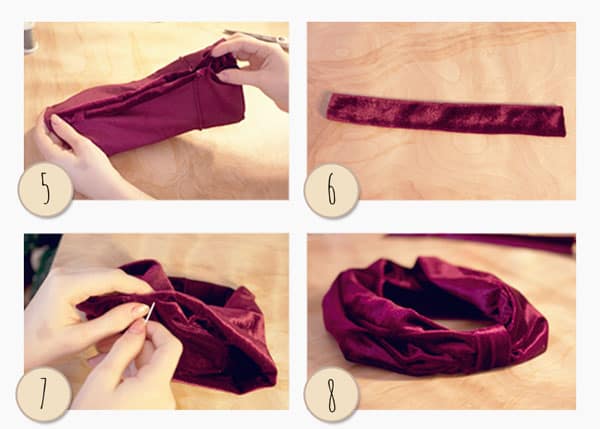
This is what it’ll look like once you’ve sewn your pinned edges together. Flip the turban right side out through the hole that you left.
    6. Cut an additional piece of fabric measuring 2.5 x 7″. Sew the long sides together and flip right side out.
    7. Stitch the hole in the turban together by hand.
    8. Wrap the narrow fabric tube you made earlier around the turban and stitch the two sides together to cinch the turban as tight as you want it. Mine ended up being 4″ in total– so the turban is cinched to 1.5″ tall. Cut the excess fabric of the narrow tube and roll it so the seam is hidden. And you’re done! You can leave the turban as is or decorate it with a brooch or a clip-on earring, like I did.


  2. DIY Luggage Tag!

    December 16, 2012 by Emma

    I’m sure all of you are done with buying and making your Christmas gifts (unlike me!), but if you’re still looking for a cute little something, might I suggest an applique luggage tag? It’s perfect for the wanderluster in your life, and you can customize the applique silhouette to their interests! It doesn’t take long to whip up and is a lovely homemade gift. Read on for the step-by-step instructions and printable template.

    1- First things first, gather up your materials. You’ll need:

    -sturdy fabric to make up your base
    -fabric for your applique
    -clear vinyl
    -tissue paper
    -matching thread
    -needle
    -sewing machine
    -pattern which you can download HERE

    For both the base fabric and the applique, I used naugahyde (fake leather) so that it would stand up to the wear and tear of travel. You don’t need much, either, I had a 1/4 yard of each and I had more than enough! I’ve included the silhouette I used, but you can always draw your own in the blank template to make sure it fits. Some fun ideas could be a crown, a heart, or their initials. Go wild!

    2– Use the pattern to cut out two tag shapes from your base fabric. These will make up the body of your tag. Cut out one rectangle shape from the clear vinyl using the template. This will become the slot that houses your information in the tag.

    3 Use the silhouette pattern to cut out one shape from your applique fabric.

    4- Pin this silhouette onto one of the tag shapes. Using your matching thread (or contrasting for a different look!), neatly hand stitch around the edge of the shape, making sure it’s secure.

    5- Using the pattern, cut out the long rectangular strip. This will make up the loop of the luggage tag. Feel free to make this longer than the pattern, as the longer it is, the easier it is to take on and off.

    6- Fold in the two long edges of the rectangle about 1/4 of an inch and iron flat. Test out your iron on a piece of scrap fabric first! If it burns it, you can sew your edges in rather than ironing them down. Then, fold your rectangle in half lengthwise again so that you have a long, skinny strip of fabric. Sew this down the middle.

    7- This is what you should have so far!

    8- Place your rectangle of vinyl on top of the base of the tag without embellishment, making sure to line up the bottom edge. Place a sheet of tissue paper on top and pin down. This will allow the vinyl to go through the sewing machine without any trouble! Stitch along the three dashed lines in the pattern. This makes the slot for you to put your information card in.

    9- Fold your strap in half and place it between the two tag pieces. Make sure that the outsides are facing each other! Sew the top edges together, leaving the bottom open.

    10- Flip the tag right side out. This is what you should have!

    11- And this is what the back should look like. 

    12- Fold in the bottom edge of the tag and stitch it down. And voila! You’re done. This would make an absolutely lovely gift paired with a travel journal or make an airplane survival kit with an eye mask, earplugs, and a nice hand lotion (under 3 fl oz of course)! Or you could always keep it for yourself ;)