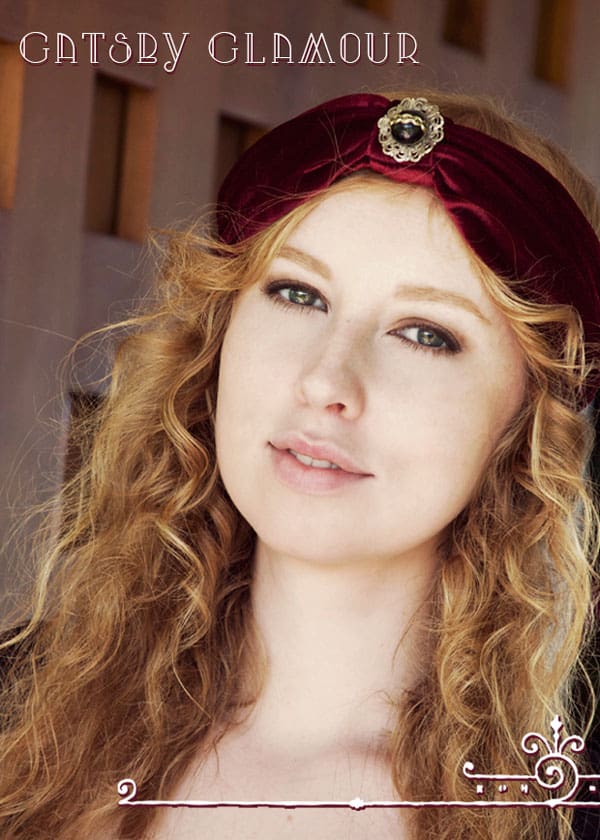
I went to see the new Great Gatsby movie on Friday and absolutely loved it. And because I never miss the opportunity to dress up, I had to wear this 1920s inspired velvet turban that I made earlier this year. I love how it adds a bit of 1920s glamour to a simple all black outfit. Now I can’t compare with Carey Mulligan’s costumes –or her jewels for that matter– but this headband made me feel quite posh while sitting in the theater. It’s really quite easy to make, too!
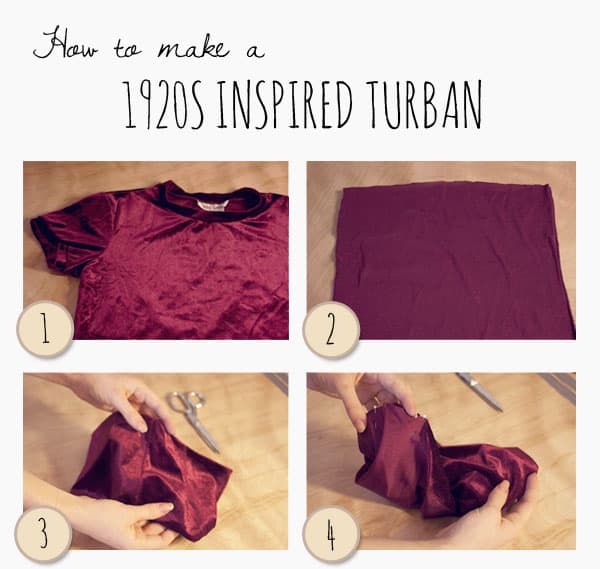
- Gather your fabric– I used this velvet children’s shirt that I thrifted. Make sure that whatever you find is stretchy!
- Next you need to figure out the dimensions of the rectangle you need to cut. Measure the circumference of your head loosely and add 1 1/2 inches to get the long side of your rectangle. Mine was 25″. The short side of the rectangle is 12″. You can make this longer if you want a more gathered look to your turban.
- Sew the short ends of rectangle together to create a tube.
- This is when it’s easy to get messed up, so pay attention to this step! The first time I did it, I managed to sew my turban shut. So, turn the sides of the turban together so that the velvet side is out. Then tuck the raw edges in like how it will be when it is finished. The reason you’re pinning this together is to make sure that you sew the correct sides together! Reach into the turban and begin to turn it inside out, pinning the edges together as you go. You can’t turn it completely inside out because of the nature of the tube. It’s going to look like a bunched up piece of fabric, but this is correct so don’t worry about it! Sew these pinned edges together, leaving a hole of about 2″ so that you can turn it right side out again.
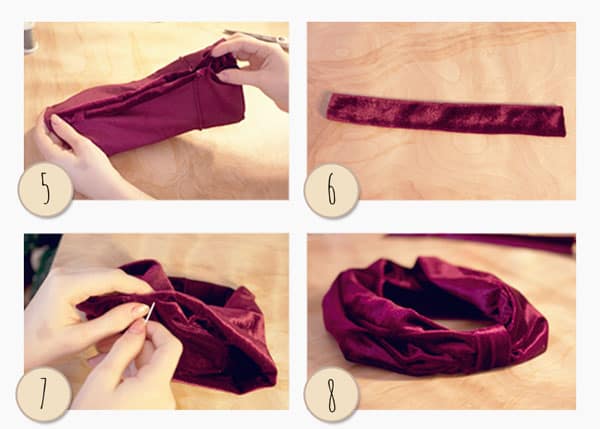 This is what it’ll look like once you’ve sewn your pinned edges together. Flip the turban right side out through the hole that you left.
- Cut an additional piece of fabric measuring 2.5 x 7″. Sew the long sides together and flip right side out.
- Stitch the hole in the turban together by hand.
- Wrap the narrow fabric tube you made earlier around the turban and stitch the two sides together to cinch the turban as tight as you want it. Mine ended up being 4″ in total– so the turban is cinched to 1.5″ tall. Cut the excess fabric of the narrow tube and roll it so the seam is hidden. And you’re done! You can leave the turban as is or decorate it with a brooch or a clip-on earring, like I did.


Ooh you saw the movie ?? I really want to watch it too, I love the 20s and I’m sure we can get inspired by the costumes etc. Ah, people were so elegant before ! I wonder why, years after years, we’ve lost this sense of style and beauty.
Your headband is really beautiful, great job ! I want to try to do one, too :-) First I have to find a shirt that I don’t want anymore haha.
Love how you did this! I would’ve love to try this, but sadly turbans look awful on me :(
x Sam
Love this. You look gogeous and 20ish indeed. I’ve pinned so I can come back!
It’s great to hear that you enjoyed it so much and I love to see that you got into the theme of it. Fabulous to see a fun DIY.
gorgeous! what a great DIY – thanks for sharing!
christen
fashionplatecheapskate.blogspot.com
Lovely! That color really looks great on you too.
I have yet to see the movie, but that turban you wore is awesome!!!
http://findingmyinspiration.blogspot.com/
you look amazing with your 1920s inspired look! thanks for sharing your great diy! :)
Metallic Paws
[…] Gatsby Inspired Turban [SOURCE] […]
Your hair is lovely!
[…] Gatsby Inspired Turban [SOURCE] […]